
Join the Weather Lovers Community at Skool
My Weather Station of Choice for Durham Weather
I’ve been using the stylish NetAtmo Weather Station for about 2 years now so I’ve given it a good test.
Within that time, i’ve had a few teething problems, but these are almost inevitable with Weather Stations and the more different types you use, the more you realise they all have their own quirks.
The NetAtmo Weather Station is no different.
Setting up the NetAtmo Weather Station is quite easy though. It’s all done through the NetAtmo mobile app, which then connects all of the modules wirelessly to your wifi network.
The NetAtmo base station is mains powered, whilst the external sensors are all powered by AA batteries.
The batteries last for a long time, powering the kit for 1-2 years without needing a change.
I did actually have a faulty external unit when I first bought the NetAtmo Weather Station.
It was chewing through battery sets every 3-4 days (clearly nor right!), but NetAtmo replaced the unit quickly under warranty within a few days.
My current is the NetAtmo Weather Station

The Netatmo Weather station comes very well packaged, direct from France (you can also get it from Amazon).
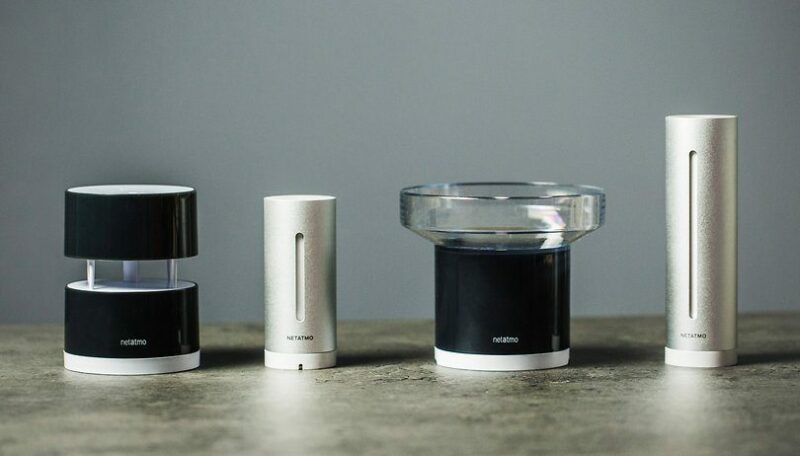
Unpacking it reveals two sleek aluminium tubes – the larger one being the base station sensor that sits indoors, and a second smaller tube that’s designed to sit outside.
The NetAtmo Weather Station Documentation is minimal, but points you to downloading an app to your phone to facilitate the installation.
The first thing to do is get the NetAtmo Weather Station base station talking to your wifi.
The base station is mains powered and once that is plugged in the app leads you through the configuration of adding the second sensor. Pretty easy stuff.
Next thing is siting the two items. I chose to sit the NetAtmo base station in the corner of the living room, behind the TV.
The base station monitors indoor temperature, humidity, atmospheric pressure, ambient noise and carbon dioxide (air quality).
Next, the outside sensor. This measures outside temperature and humidity. It also allows Dew Point to be derived mathematically from these readings.
The small external NetAtmo sensor runs from two AA batteries which need to be installed when pairing with the base station.
It comes with a mounting strap with velcro attachment, designed to secure it around a drainpipe or post.
It also comes with a slot at the back of the aluminium casing by which you can attach it to a wall with a screw.
This was my chosen mounting option and I put it on the north facing wall of my shed (the only place in the garden not to receive direct sunlight).
I had read online that the sensor needed sheltering from direct rain, as it would mean the humidity readings would stay high until the sensor dried out.
For that reason I installed a little pelmet above it, made from PVC tongue and groove cladding, to protect it from the rain. This seems to work very well.
Here’s a superb video, showing all the standard NetAtmo Weather Station modules and setup.

Extra purchase was the NetAtmo Rain Gauge

I also purchased the Netatmo rain gauge, but unfortunately forgot to get a mounting bracket (sold separately) so I couldn’t set this up straight away.
The NetAtmo rain gauge is very sleek and has a broad, transparent plastic funnel top and a black cylinder below housing the tipping bucket rain detector.
Each tip is calibrated at 0.1mm of rain, so it’s quite high resolution.
There’s a screw hole in the base for attachment to the bracket, which I secured to a fence post with three screws.
It’s important that the top of the rain gauge is perfectly level to make sure the ‘tip’ works properly, so I set it up with a spirit level to make sure.
There is also an ingenious Netatmo anemometer if you have a suitable site for mounting and correct exposure.
The data on the station can be shown via a Widget (actually from a 3rd party Netatmo site) and Netatmo also operate their own Network where other station owner’s data can be seen on a map.
This is useful for local comparisons and it’s easy to see when a station is incorrectly sited.
I can see a couple of local stations where the temperature is wildly high on warm days, so it’s important to get that right.
The third party sites can also enable much more extensive analysis than the Netatmo one and it’s possible to set up a weather station page to display current readings.
Verdict
The NetAtmo weather station is a very capable device for amateur weather observers and provides accurate data, and being wireless it can be installed discretely without much fuss.
The phone app from NetAtmo is uncomplicated, but there are numerous other third-party ones that offer better visualisation of the data. I’m currently using Myatmo and Smartmixin.
Setup is easy using a smartphone such as an iPhone or Samsung device.
It looks good, and could very easily fit in with modern decor in the living room or study and wouldn’t look out of place at all.
It’s smooth lines allow it to blend with any modern furniture.
This page contains an affiliate link. If you purchase through this link, the site will receive a small commission at no extra cost to yourself
Buy a NetAtmo Weather Station From : Amazon
Join the Weather Lovers Community at Skool
The Netatmo Weather Station sounds like a reliable and stylish choice for gathering weather data. It’s great to hear that you have been using it at Durham Weather for a couple of years and that it has proven to be accurate. It’s understandable that there may be some initial challenges with setting up and calibrating the rain gauge and anemometer, but it’s good to know that these issues can be overcome. The ability to view data from other station owners on a map is a helpful feature for local comparisons. Thanks for sharing your experience with the Netatmo Weather Station!